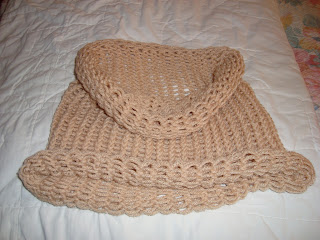
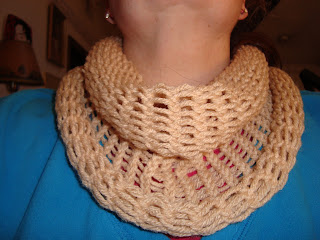
Loom Knit Cowl neck warmer:
I have been wanting to try something on my own with the Knifty Knitter Looms I have been collecting. They are so pretty I can't resist picking up another one when I find one on sale or at a garage sale. I now have a small trunk full of them. All sizes, shapes, and those cheery colors, so I figured that I should try something beside the baby hat pattern that was included with one set. Anyway, I was thinking of making a poncho, having no idea what size I was making, I found that there was no way it was going to fit. I didn't want to pull out my work, hence, the cowl neck warmer. I have been seeing these cowls everywhere I look lately, even the fashion mags, so why not try it with the loom. Well here it is, I really like it and wear it all the time. In this neutral color, it goes with just about anything in my closet. It's just enough to keep out the cold air and very comfy. The picture that I'm am modeling happened to have a stray hair land on it which I didn't realize when I loaded it so please excuse.
Here is the Super Easy Pattern, Try it, It's a lot of fun, useful too:
A small amount of one skein of Red Heart "Super Saver" yarn. Very inexpensive.(I used this beige color, but you can use any color that pleases you). Experiment with other worsted weight yarns or even sport weight.
You will need the extra large round Knifty Knitter. (The yellow one)
Normally, you would use a heavier yarn on these looms, but I wanted a very light airy feel so I used one strand of the Red Heart yarn that I chose. Now cast on as your instruction sheet that came with your loom explains by e-wrapping the pegs. If you don't have the instructions, just type in Knifty Knitter at youtube.com and you will find tons of info. You will have 2 cast on rows before starting to knit.
Just knit in the normal way by lifting the bottom loop over the top loop as you knit around the loom until you have 50 rows or whatever you desire. I wanted 50 rows because the edges normally curl up as shown and you will need extra length to get a nice loose cowl effect. When you have 50 rows, you will cast off your knitting using a crochet hook or your knifty Knitter tool that came with it. Weave in your ends and it's ready to wear. Again, if you need help with any process, casting on, casting off, e-wrapping, loom knitting, there are so many great videos to help you. That's how I learned it. Good Luck! Hope you have fun, there is no right or wrong. If you like the way it comes out, that's all that matters :) Barbie
One more tip: Very important to keep your yarn very, very, loose throughout the project.
My Kitchen in Autumn

Wednesday, January 19, 2011
Wednesday, January 12, 2011
Winter Wonderland! Great time to read!
Sometimes I forget how nice it is to actually read a book. I have been reading "The Vampire Chronicles" by Anne Rice, btw, I would love to hear from others who may be reading or have read this series. We're having a Blizzard here in New England. I heard that 24,000 people in my County are without power still. Since my hubby works for the power Co., I can tell you that they are out working on that.
Anyway, The power went out early this morning, before it was light out and I was bored and wide awake so I was able to read (with a flashlight), and really get into my book. Not like how I usually read, a few minutes before bed or while waiting for water to boil. Aaah, what should I read next?
Anyway, The power went out early this morning, before it was light out and I was bored and wide awake so I was able to read (with a flashlight), and really get into my book. Not like how I usually read, a few minutes before bed or while waiting for water to boil. Aaah, what should I read next?
Sunday, January 9, 2011
FREE Crochet Pattern Today!
This is an easy pattern for a handy little drawstring pouch. I use it to hold a "sock project" or other small project. It's beginner level and you can use any worsted weight yarn that you may have in your stash. (I would stay away from novelty types of yarn if you are a beginner), it's hard to see and count your stitches.
This is my original pattern, but feel free to use it as you may. You will need a size H crochet hook or one that is right for your yarn. There is usually a suggestion on the yarn wrapper "ball band".
Using 2 strands together, ch. 4. join to the first ch. to form a ring.
- ch. 3, 11 dc. in the ring. join to the top ch. of the ch. 3 with a sl. st.
- ch. 3, 2 dc. in each st., join to ch. 3 with a sl. st.
- ch. 3,* 2 dc. in the next st., 1 dc. in next st., rep. from * around. join to ch. 3
- ch. 3, 1 dc. in the next st., *2 dc. in the next st, 1 dc. in the next 2 dc.*, rep. between *s. join to ch. 3.
11. ch. 4, skip 1 dc., dc. in next st. *ch. 1, skip 1 st., dc. in next st.* rep. between *s for eyelet row. join in the 3rd ch. of the ch. 4. (The eyelet row is for the drawstrings to be woven through).
12. ch. 3, 1 dc. in each dc. an each ch. 1. Join to ch. 3
13. ch. 3, dc. in each st.. Join to ch. 3
14. ch. 2, sc. in each st. Join to ch. 2. fasten off.
To make the drawstrings:
Make 2 strings. Ch. 100 for each string. fasten off.
Start threading each string separately through the eyelet holes. Make sure they stay separate while you tie each one to itself with a small knot completing 2 separate circles.
To close the bag: Grab a loop from each side of the bag and pull. (I hope this makes sense. It's really easy, just difficult to explain in writing)
Hope you like it, I sometimes wear it on my wrist. I can knit while I'm walking. Can you tell I'm obsessed? LOL
Tuesday, January 4, 2011
KUDOS to all of the hard-working nurses out there!!!!!
Unfortunately, I've spent the better part of 2 days at our local hospital with my husband's mom. She's 82 and has been very sick. While waiting forever for her to be admitted, my husband and I observed some of the most dedicated nursing staff. They were literally running from room to room, having to deal with so many different ailments and still managed to keep a warm smile on their faces, comforting their sick, frightened patients.
On the drive home, we contemplating all the people who complain about their jobs, while these nurses and other staff are never given the credit they deserve. So to all of the nurses out there, I dedicate this post to you!
THANK YOU!
Monday, January 3, 2011
My first post, My first Blog!
Hi Everyone!
I'm so excited to finally have my own blog. I don't know what took me so long but I'm finally here.
I'll be posting some pics of my recent projects soon if you're interested in that sort of thing.
I always have an idea for something new to try knitting and I'm hoping that you will share some of your ideas with me. I'd love to hear about any great books you may be reading, or any other creative endeavors that you would care to share. Happy New Year's to all!
Barbie
Subscribe to:
Posts (Atom)


