My Kitchen in Autumn

My Kitchen in Autumn

Tuesday, September 20, 2011

I have a new hat for sale in my Etsy shop

http://www.etsy.com/listing/82095028/slouchy-hat-knit-in-beautiful-italian
 This is the one that I was working on, on the way home from New Hampshire. I finally have my head model and one of the wigs. I think it makes a big difference compared with the Styrofoam ones that I have been using. I just started working on another one with the same yarn. I wasn't that happy with the looks of the yarn in the skein, but when it is knitted up, I love it. It's so soft. The yarn is Moda Dea
"Cartwheel" in the color Coral, just in case anyone would like to make their own hat in this yarn. It's a bulky yarn that is "thick and thin", kind of rustic and warm.

Wednesday, August 17, 2011

New Hats for my Etsy Shop


I have been working hard designing some new hats for my Etsy shop. This is the first time for me completely designing hats from start to finish. It's a lot harder than it looks. I have scoured all my reference books for pattern ideas, looked at fashion magazines etc. and have come up with a few different designs for my hats. My college age son told me that he has seen lots of girls walking around the college area wearing "slouchy" hats so I decided to try my hand at it. So far I only have made one in each style, but I am planning on adding some different variations and colors. I'd love to know what you think of them. :)

Sunday, July 24, 2011

Free Pattern! cushion covers for you're favorite headphones

I have another free pattern for you today. Do you have a favorite pair of headphones that the cushions for your ears are falling apart? Seems like a waste to throw them away. I had some cotton candy pink yarn, leftover from my cupcake hat, (archived on this blog) It's very soft and "cushiony" a bulky weight yarn.I came up with this very easy, quick way to keep using my headset comfortably. Hope you'll try it. :)

A small amount (just a few yards) of whatever bulky weight yarn that suits you
size H crochet hook or whatever feels right with the yarn you have chosen
chain 6, join with a slip-stitch to form a ring
chain 3, 14 double crochets in the ring, join with a slip-stitch into the 3rd chain of the chain 3
chain 3, 2 double crochets in each stitch all the way around, join with a slip stitch into the 3rd chain of the chain 3 of the previous row
leaving about 18 " cut the yarn and thread it into a yarn needle ( a large eye blunt tipped needle)
Now weave your yarn in and out, all around the stitches of the last row.
place your cover onto the headphone cushion and if you have to, stretch to fit and cinch it closed
now just tie a secure knot and weave in the yarn tail to hide it.
note: if your headphone cushions are larger than mine, just add an extra row before ending.

If you have a questions, leave a comment here and I will try to answer it for you. Good Luck :)

Friday, July 15, 2011

Coral Bath Puff finished


I finally finished my hyperbolic bath puff. It was fun. This was an experiment to begin with, just to see how it would develop. Next time I will use some soft cotton yarn and make one I can really use. I decided not to add the second color, only because I couldn't find anything in my stash that would look right. Anyway, that's that. Have a great weekend!

Monday, July 11, 2011

"Bite Me" Fingerless gloves

Here are the pics of the Twilight gloves that I mentioned earlier. I finally uploaded my pics. I bought the pattern on ravelry.com from someone called "lovebug mama's designs" in case you are interested in making a pair. (a little shout- out to a fellow designer) They were pretty easy to make. The gloves are knitted first, then the design is duplicate stitched on later. I think they're pretty cute :)

Just had to throw in one of my sweetie-pie Moe modeling one of his many sweaters.

Sunday, July 10, 2011

Hyperbolic Crochet Update


I haven't finished the "coral" bath puff yet, but I thought I would add some pics of it in progress. Even thought it is a small project, there are a ton of stitches in it. It's kind of mesmerizing watching it grow.

Saturday, July 2, 2011

What's with the neon green text? and Hyperbolic Crochet Pattern

Sorry about the silly green text. For some reason, I wasn't able to change it. Oh well I guess You'll have to put on your shades before reading hee hee.
 

Lately, I have been interested in "hyperbolic crochet" I checked out a link featuring a display of a crocheted coral reef. I don't have the link but if you want to see it, just google Hyperbolic crochet or crochet coral reef and you will find it. It's amazing!! I can't believe how much these free-form crochet pieces really resemble a coral reef. Right now, I am crocheting my own model of a coral using the "hyperbolic crochet" method. Hyperbolic is a mathematical term, so I am told by my engineer son. It describes an un-even plane that when crocheted, grows larger using the same sequence over and over, and turns into a coral like object that, made in cotton yarn, makes a great bath puff.
What I am trying, is making a chain of 2, then six single crochets into the second chain from the hook. Now just continue around and around putting 2 single crochets in each stitch until your coral (bath puff) is as large as you want. To make it more interesting change colors on the last row and single crochet once into every stitch around. I'll post pics of mine very soon.:)

Pink Baby Blanket Update


Hi fellow knitters, just wanted to update you on the progress of the baby gift. I finished the edging, making up my own shell st. border. I framed it with 2 rows of single crochet then one row of rather large shell stitches. I think it came out pretty cute. :) Luckily, the baby shower isn't for 3 weeks because I've been pretty sick for a while. A bad sore throat ,coughing, miserable, so I have to make sure I'm not contagious before I meet the new baby. Hope you are all well and having a fun July 4th weekend Barbie 

Wednesday, June 15, 2011

Loom Knitted Baby Blanket

I just found out that I have a new little family member. I haven't met her yet, but I've seen pictures. my niece and her husband are in the process of adopting a baby girl. I want to make make her something special. I found some soft pink yarn from Lion Brand. It looks like Homespun but I forget the actual name since I through out the ball bands. I starting loom knitting it on my knifty knitter, longest loom. I used every peg, all the way around then turned and knit back. I ended up with a rectangle about 2 ft. by 3 ft. It didn't seem large enough to me, or finished enough, so now I'm am crocheting a border all the way around. So far I have added 2 rows of single Crochet stitches. I'm thinking about adding a shell st. border or some sort of open work st, but I haven't decided yet. If anyone has any ideas on how to finish this blanket, I would love to hear them, just leave a quick message. I will upload pictures when I finally finish it.

Wednesday, March 9, 2011

Some finished Projects

I just noticed that in my last post, I commented that I found the "Eclipse Socks" pattern on etsy, but I must have been tired when I wrote that. I actually found the pattern on ravelry.com, you must have an account to access the patterns. Here is the pictures I promised. I used  a #1 circular needle. 32" long. I used the magic loop method. It was a lot of fun and I couldn't believe how fast they worked up.

I also just completed this knitted corset top. I finished the knitting quite a while ago, but I couldn't find the right buttons to go with it. I ended up finding just the right ones on ebay. It's very hard to find 23 of the same buttons and have them match the garment. Anyway, this corset top is from designer, Annie Modesitt, one of my favs. I saw her demo it on the TV show, Knitty Gritty and I was able to download the pattern free at the time on diynet.com I'm not sure if you can still get it for free. I've had it printed out for a couple years and finally made it. The cream colored trim is made of Lion Brand Suede. I think it was perfect. the buttons are called coffee cream, and that's just what they look like. The sage yarn is acrylic, not by choice, but wool is so expensive for a whole sweater. Now, I'm knitting some "Twilight mitts" from a pattern that I purchased on ravelry.com. I'll take take some pics soon.

Tuesday, February 8, 2011

Knitting Through The Snow Storms!

I've been doing a lot of knitting lately. It seems like it snows at least once a day around here. I don't have any problem finding things to do during the storms. all I need is some yarn and a couple needles, then I have a good excuse to put my feet up and try out some new patterns or ideas that I have. One of the latest idea I had is a "cupcake hat" I had some chocolate brown wool and some candy pink novelty yarn that always looked like pink frosting to me. I've had it for a while and never knew what to do with just one ball of it.

     Then I got the idea of making a chocolate cupcake with pink frosting for a hat with a pink "cherry" on top. the cherry is a tiny crocheted ball with polyester fiberfill stuffed inside. I think it came out cute. I'm thinking about selling it in my etsy shop.

Wednesday, January 19, 2011

FREE Pattern! Loom Knit an easy Cowl Today!

Loom Knit Cowl neck warmer:

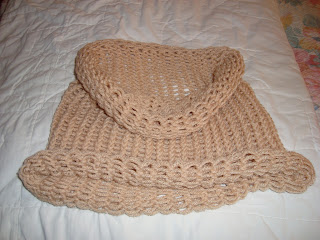
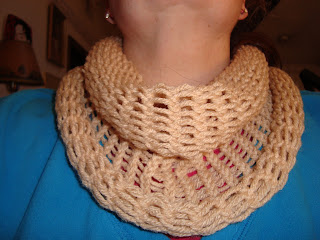
I have been wanting to try something on my own with the Knifty Knitter Looms I have been collecting. They are so pretty I can't resist picking up another one when I find one on sale or at a garage sale. I now have a small trunk full of them. All sizes, shapes, and those cheery colors, so I figured that I should try something beside the baby hat pattern that was included with one set. Anyway, I was thinking of making a poncho, having no idea what size I was making, I found that there was no way it was going to fit. I didn't want to pull out my work, hence, the cowl neck warmer. I have been seeing these cowls everywhere I look lately, even the fashion mags, so why not try it with the loom. Well here it is, I really like it and wear it all the time. In this neutral color, it goes with just about anything in my closet. It's just enough to keep out the cold air and very comfy. The picture that I'm am modeling happened to have a stray hair land on it which I didn't realize when I loaded it so please excuse.
Here is the Super Easy Pattern, Try it, It's a lot of fun, useful too:
A small amount of one skein of Red Heart "Super Saver" yarn. Very inexpensive.(I used this beige color, but you can use any color that pleases you). Experiment with other worsted weight yarns or even sport weight.
You will need the extra large round Knifty Knitter. (The yellow one)
Normally, you would use a heavier yarn on these looms, but I wanted a very light airy feel so I used one strand of the Red Heart yarn that I chose. Now cast on as your instruction sheet that came with your loom explains by e-wrapping the pegs. If you don't have the instructions, just type in Knifty Knitter at youtube.com and you will find tons of info. You will have 2 cast on rows before starting to knit.
Just knit in the normal way by lifting the bottom loop over the top loop as you knit around the loom until you have 50 rows or whatever you desire. I wanted 50 rows because the edges normally curl up as shown and you will need extra length to get a nice loose cowl effect. When you have 50 rows, you will cast off your knitting using a crochet hook or your knifty Knitter tool that came with it. Weave in your ends and it's ready to wear. Again, if you need help with any process, casting on, casting off, e-wrapping, loom knitting, there are so many great videos to help you. That's how I learned it. Good Luck! Hope you have fun, there is no right or wrong. If you like the way it comes out, that's all that matters :) Barbie
One more tip: Very important to keep your yarn very, very, loose throughout the project.

Wednesday, January 12, 2011

Winter Wonderland! Great time to read!

   Sometimes I forget how nice it is to actually read a book. I have been reading "The Vampire Chronicles" by Anne Rice, btw, I would love to hear from others who may be reading or have read this series. We're having a Blizzard here in New England. I heard that 24,000 people in my County are without power still. Since my hubby works for the power Co., I can tell you that they are out working on that.

   Anyway, The power went out early this morning, before it was light out and I was bored and wide awake so I was able to read (with a flashlight), and really get into my book. Not like how I usually read, a few minutes before bed or while waiting for water to boil. Aaah, what should I read next?

Sunday, January 9, 2011

FREE Crochet Pattern Today!


SMALL DRAWSTRING POUCH
This is an easy pattern for a handy little drawstring pouch. I use it to hold a "sock project" or other small project. It's beginner level and you can use any worsted weight yarn that you may have in your stash. (I would stay away from novelty types of yarn if you are a beginner), it's hard to see and count your stitches.
This is my original pattern, but feel free to use it as you may. You will need a size H crochet hook or one that is right for your yarn. There is usually a suggestion on the yarn wrapper "ball band".

Using 2 strands together,  ch. 4. join to the first ch. to form a ring.
  1. ch. 3, 11 dc. in the ring. join to the top ch. of the ch. 3 with a sl. st. 
  2. ch. 3, 2 dc. in each st., join to ch. 3  with a sl. st.
  3. ch. 3,* 2 dc. in the next st., 1 dc. in next st., rep. from * around. join to ch. 3
  4. ch. 3, 1 dc. in the next st., *2 dc. in the next st, 1 dc. in the next 2 dc.*, rep. between *s. join to ch. 3.
   5-10.  ch. 3, 1 dc. in each st. Join to ch. 3.
    11. ch. 4, skip 1 dc., dc. in next st. *ch. 1, skip 1 st., dc. in next st.* rep. between *s for eyelet row. join in the 3rd ch. of the ch. 4. (The eyelet row is for the drawstrings to be woven through).
     12. ch. 3, 1 dc. in each dc. an each ch. 1. Join to ch. 3
      13. ch. 3, dc. in each st.. Join to ch. 3
      14. ch. 2, sc. in each st. Join to ch. 2. fasten off.

To make the drawstrings:
Make 2 strings. Ch. 100 for each string. fasten off.
Start threading each string separately through the eyelet holes. Make sure they stay separate while you tie each one to itself with a small knot completing 2 separate circles.
To close the bag: Grab a loop from each side of the bag and pull. (I hope this makes sense. It's really easy, just difficult to explain in writing)

Hope you like it, I sometimes wear it on my wrist. I can knit while I'm walking. Can you tell I'm obsessed? LOL 

Tuesday, January 4, 2011

KUDOS to all of the hard-working nurses out there!!!!!

Unfortunately, I've spent the better part of 2 days at our local hospital with my husband's mom. She's 82 and has been very sick. While waiting forever for her to be admitted, my husband and I observed some of the most dedicated nursing staff. They were literally running from room to room, having to deal with so many different ailments and still managed to keep a warm smile on their faces, comforting their sick, frightened patients.
 On the drive home, we contemplating all the people who complain about their jobs, while these nurses and other staff are never given the credit they deserve. So to all of the nurses out there, I dedicate this post to you!
       THANK YOU!

Monday, January 3, 2011

My first post, My first Blog!

Hi Everyone!
I'm so excited to finally have my own blog. I don't know what took me so long but I'm finally here.
I'll be posting some pics of my recent projects soon if you're interested in that sort of thing.
I always have an idea for something new to try knitting and I'm hoping that you will share some of your ideas with me. I'd love to hear about any great books you may be reading, or any other creative endeavors that you would care to share. Happy New Year's to all!
Barbie